Hello, friends! I am so thrilled you’re here today because we are talking about one of my favorite ways to add a polished, professional finish to a project: machine embroidery!
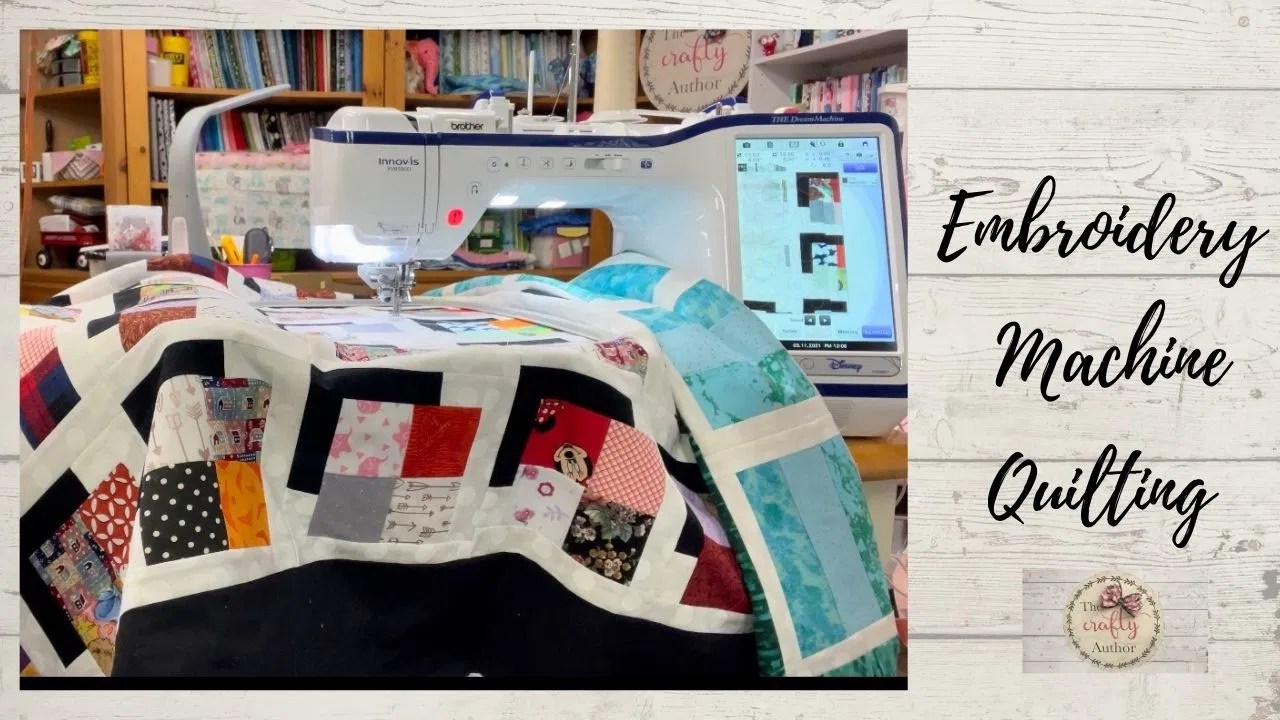
There is something so exciting about watching an embroidery machine almost paint with thread. One minute you have a plain piece of fabric, and the next you have a beautiful monogram, a custom quilt label, or a crisp decorative design stitched out with amazing precision. In my studio, I work with my Bernina, Brother, and Ricoma machines, and each one plays a special role in helping me bring creative ideas to life in a fast, beautiful, and repeatable way.
Have you ever looked at a quilt, bag, towel, or gift and thought, "This needs a little something extra"? Machine embroidery is such a fun way to make your projects feel custom without adding a lot of guesswork. And if you’re brand new, don’t worry! I’m going to keep this simple, approachable, and beginner-friendly.
Are you ready to dive in with me? Let’s get stitching!
Why You’ll Love Machine Embroidery
Before we get into the supplies, let’s talk about the "why." I love machine embroidery because it combines creativity with speed and precision. You get that gorgeous stitched look, but the machine helps you create clean, consistent results that would take much longer to do by hand.
That means you can make beautiful, repeatable designs for things like quilt labels, monograms, baby gifts, personalized bags, and home décor accents. If you love adding meaningful details to your sewing and quilting projects, machine embroidery is such a satisfying skill to learn!
It also takes a lot of the intimidation out of decorative stitching. Once you understand a few basics, you can repeat the process again and again with more confidence each time. And honestly, watching a design stitch out never gets old!
Gathering Your Beginner Machine Embroidery Kit
The best part about getting started with machine embroidery for beginners is that you really only need a few key supplies to begin successfully.
Here is what I recommend for your basic starter kit:
- Stabilizer: This is a must! Start with cut-away stabilizer for stretchy fabrics or designs that need lasting support, and tear-away stabilizer for more stable woven fabrics and simple designs.
- Machine Embroidery Thread: Look for good-quality polyester or rayon embroidery thread. These threads give you that smooth, shiny finish that makes designs really pop.
- Machine Embroidery Needles: Use needles made specifically for embroidery machines. They’re designed to protect your thread and help reduce skipped stitches.
- Hoops: Proper hooping is everything! A secure, smooth hooping setup helps your machine stitch accurately and keeps puckering to a minimum.
- Fabric: Start with stable fabrics like quilting cotton so you can focus on learning the process without fighting the material.
- Small Scissors: A sharp pair of snips is perfect for trimming jump threads and cleaning up your final project.
If you’re brand new, my biggest advice is this: don’t overcomplicate your supply list. Start with a few basics, practice on scraps, and let your confidence grow from there.
"Machine embroidery feels like painting with thread, and every stitch adds confidence."
The Basics That Make a Big Difference
When beginners run into trouble with machine embroidery, it usually comes down to just a few things: stabilizer choice, thread, needle selection, and hooping. The good news? Those are all easy to improve once you know what to watch for.
1. Choose the Right Stabilizer
Your stabilizer supports the fabric while the design stitches out. If your fabric stretches or the design is dense, cut-away is usually the better choice. If your fabric is stable and the design is lighter, tear-away can work beautifully.
2. Use Embroidery Thread, Not General Sewing Thread
Embroidery thread is made to create that polished decorative finish. Polyester is durable and beginner-friendly, while rayon gives you that gorgeous sheen so many of us love.
3. Don’t Skip the Right Needle
A fresh machine embroidery needle can make a huge difference in stitch quality. If your stitches start looking messy or your thread begins breaking, your needle is one of the first things I would check.
4. Practice Good Hooping
Hooping can feel awkward at first, but it matters so much. You want your fabric and stabilizer smooth and secure in the hoop, not stretched out of shape. A well-hooped project gives your design the best chance to stitch beautifully.
Beginner-Friendly Machine Embroidery Projects
Once you have your supplies ready, it’s time for the fun part! If you're looking for diy craft projects that work well for beginners, these are wonderful places to start:
- Quilt Labels: This is one of my favorite uses for machine embroidery. A stitched name, date, or sweet message gives your quilt such a personal, polished finish.
- Monogrammed Towels or Napkins: These make beautiful gifts and let you practice clean lettering on simple shapes.
- Personalized Tote Bags: Great for gifts, classes, or everyday use, and so satisfying to customize!
- Simple Baby Gifts: Think bibs, burp cloths, or little keepsakes with a name or initial stitched right on them.
If you already enjoy quilting, machine embroidery fits right in. It gives you another way to personalize your work and add those thoughtful details that make a project feel truly special.
A Peek at My Machine Embroidery Setup
In my studio, I love working with different machines depending on the project. My Brother machine is wonderful for precision and beginner-friendly stitching, and I rely on verified studio setups to show exactly how machine embroidery looks in real life.
As you grow your skills, you’ll start to see just how much machine embroidery can do. It’s fast, accurate, and incredibly rewarding, especially when you want to create beautiful results again and again. Whether you’re stitching quilt labels, monograms, or custom gifts, machine embroidery is such a fun way to add a professional touch while still keeping that handmade heart.
Shop Our Partners
Affiliate disclosure: This page contains affiliate links. If you shop through these links, I may earn a small commission at no extra cost to you. Thank you for supporting The Crafty Author!

[ ](Shop Now placeholder)
Let’s Get Crafty!
I hope this guide has inspired you to give machine embroidery a try! It truly is one of the most satisfying ways to add a clean, custom finish to your sewing and quilting projects. And remember, you do not have to know everything before you begin. Start simple, practice often, and let your machine help you build confidence one design at a time!
Are you planning to stitch a quilt label, monogram a gift, or try your very first embroidery design? I would love to hear what you’re working on! Leave a comment below or join us over in The Crafty Author Clubhouse™ (COMING SOON!) to share your progress.
Stay creative, friends! 💖
Warmly,
Anisa
The Crafty Author